Install Browzy
Written for someone who has never used a terminal. Every command, and what you should see after each one.
Two halves, and they have to match
Browzy is two pieces: a browser extension and a companion (native host) process. The extension can't do anything on its own — it talks to the companion through Chrome's native messaging, and Chrome refuses to connect unless the companion is already registered on disk. That's why there's always a step outside the browser; "Load unpacked" alone is never enough.
| Half | What it is | Where it runs |
|---|---|---|
| Extension | The interface and browser control | Inside Chrome, Edge, or Brave |
| Companion (native host) | The agent's brain — runs the Claude Agent SDK | A Node process on your machine |
Before you start
Installation
-
1. Get the source code
Open a terminal (Git Bash on Windows, Terminal on macOS/Linux) and run:
git clone https://github.com/Nguy-n-Th-Huy/Browzy.git
cd Browzy
What you should seeYou should see a new Browzy folder appear, and your terminal prompt now shows you're inside it.
-
2. Install the companion
Pick the line for your platform. This single command installs dependencies, derives the extension id from the manifest, and registers the native host for every browser it finds. The Windows line carries an -ExecutionPolicy Bypass prefix on purpose: PowerShell refuses every unsigned .ps1 by default, including one sitting on your own disk, so the plain .\install.ps1 fails on a clean machine. The prefix applies to that single run and changes nothing on your system.
macOS / Linux / Git Bash./install.shWindows PowerShellpowershell -ExecutionPolicy Bypass -File .\install.ps1What you should seeThe script prints "Done! Next steps" followed by a reminder to restart your browser. Running it again later is harmless — with nothing changed it prints "Already up to date" and writes nothing.
-
3. Load the extension
Open chrome://extensions (or edge://extensions, brave://extensions), turn on Developer mode in the top-right corner, click Load unpacked, and select the extension/ folder inside the repo you just cloned.
What you should seeThe Browzy card appears with id ihljfjgoakmoemkdondoaadegpmibimh — the same id on every machine and every reload, because the extension ships a fixed manifest key. There is no id to copy anywhere.
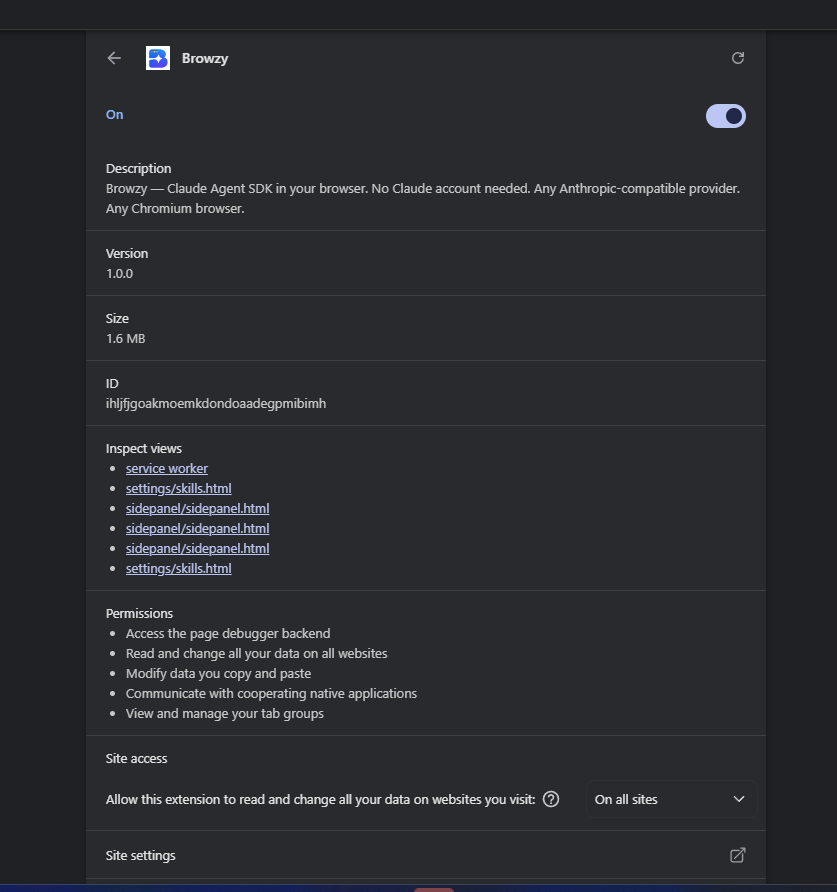
The Browzy entry in chrome://extensions — enabled, with the fixed id ihljfjgoakmoemkdondoaadegpmibimh that every machine gets. -
4. Restart your browser
Close all windows and reopen the browser completely. Browsers read native-messaging host configuration on startup, so this step is not optional.
What you should seeThe browser restarts; there is nothing else to check yet.
-
5. Add your API key
Open the Browzy panel (click its toolbar icon) and open Settings — its gear icon, or right-click the extension icon and choose Options. Enter your Base URL, your API key, and at least one Model ID, then click Test connection.
What you should seeTest connection makes one small, billed request to your endpoint. Once it passes, the composer accepts messages — that's the panel actually working.
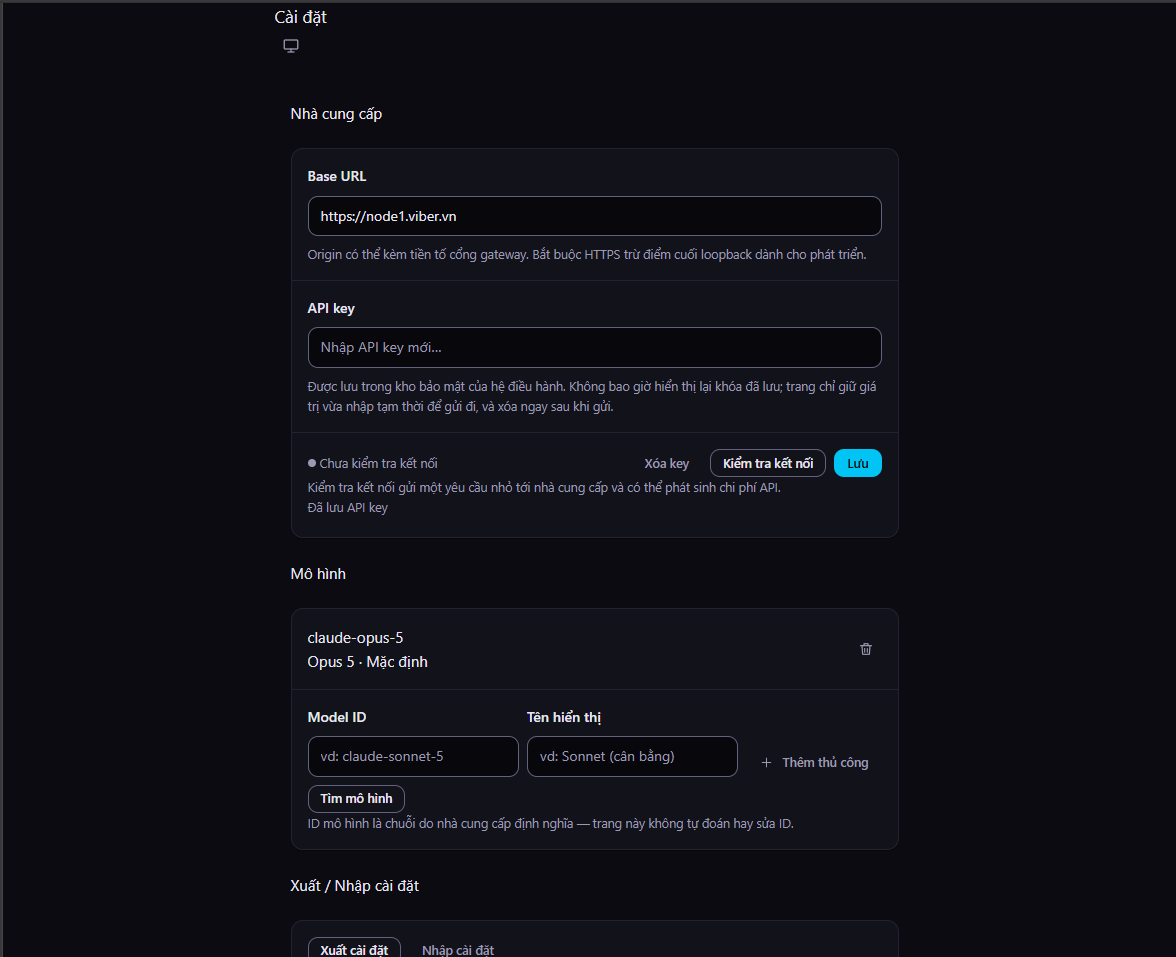
Settings: your own Base URL and API key, and the model to use. The key goes into your operating system credential store, not the page.
If something goes wrong
This is Windows' execution policy, not a Browzy error: PowerShell refuses every unsigned .ps1 by default, including one sitting on your own disk. You hit this by running .\install.ps1 directly instead of the line above, which carries the -ExecutionPolicy Bypass prefix that avoids it. Use that line, or Git Bash and ./install.sh. To stop hitting it for good, set it once for your own account (no admin rights needed): Set-ExecutionPolicy -Scope CurrentUser -ExecutionPolicy RemoteSigned.
The extension can't find the native host. Rerun the install command for your platform, then reload the extension at chrome://extensions.
The companion is registered but won't start. Run the doctor command below — the most common cause is a registration pointing at a path that no longer exists, usually because the repo folder was moved or renamed after installing. Rerunning the installer fixes it.
The registration stores an absolute path to this exact folder. Moving or renaming it breaks that path — rerun the installer from the folder's new location.
Diagnose with browzy doctor
A read-only check — it changes nothing. Run it from inside the cloned repo:
node host/bin/browzy.js doctorIf you installed the companion globally via npm (see the FAQ below), the shorter browzy doctor works the same way.
How to read it
- Default extension id — the id doctor expects the companion to answer for.
- native-host.js present: yes/NO — whether the companion file this checkout points at actually exists.
- One block per browser it checked, each showing the manifest path, the host path it points at (exists or MISSING), and the allowed_origins it was registered with.
Frequently asked
I already installed the npm package — why do I still need to clone?
The @huydepzai2810/browzy-host package on npm contains only the companion, not the extension. Load unpacked needs a real extension/ folder on disk, so today, if you have to clone anyway to get the extension, ./install.sh already installs the companion too — npm i -g adds nothing. The npm route only matters once Browzy ships on the Chrome Web Store, where the extension comes from the store and only the companion is missing.
Where does my data go?
Nowhere through Browzy's own infrastructure — there isn't any. Page content and your messages go straight from your machine to the AI endpoint you configure.
Read the privacy policyReady to try it?
Head back to the Browzy overview, or go straight to the repository.